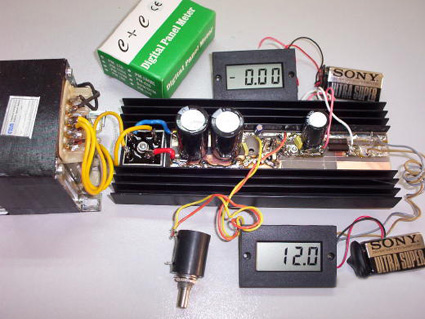
This is a LM338 based power supply which is not complicated and easy to build. I am using the supply for a long time, have no problem yet. Only current adjust is missing but I overcome this situation by using an LCD panel ampermeter. There is no PCB for the circuit. I took a 3x16 copper plate and strip the unused areas by a knife. If you want you can use analog meters instead of LCD panels.
Posted on Wednesday, April 2, 2008 • Category:
Remote Control
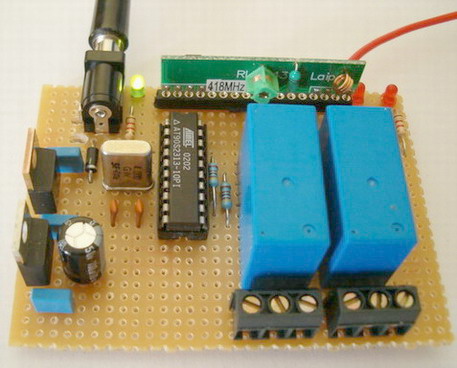
How many times you needed some remote control to handle some electric device ? many times. There are lot of remote controls like infrared, RF, SMS (like my other circuit) and more. The basic small-range remote controls are 2, Infrared and RF (Radio Frequency). One of the weaks of Infrared is that the signal can not pass the walls. So, if you want to control your garage door, the only way is to use some RF remote control. The circuit (transmitter and receiver) use few components and ordinary (I love few component circuits) . Its easy to build it because you don't have to tune-up any coil or variable capacitor. The RF modules are fix to work in 418MHz area.
Posted on Wednesday, April 2, 2008 • Category:
Headphone Amplifiers
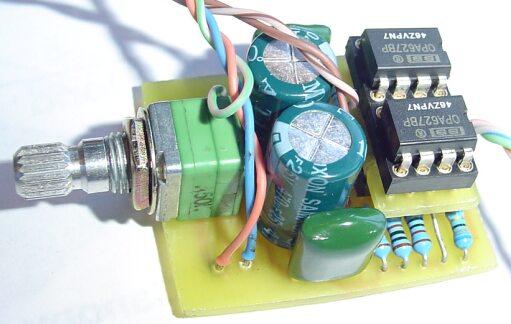
This is a Chu Moy headphone amp I made. I got the PCB design from Guzzler from Head-Fi and the original design is very popular and is here. I changed Guzzler's layout so I could use a Taiwan Alpha pot on the PCB. These pots a high quality (some say better than ALPS blue velvet) and are available from Jaycar. You can see the thread here. I also made a DIY Brown dog adapter so I could use two OPA627 single opamps in a dual opamp socket.
Posted on Wednesday, April 2, 2008 • Category:
PLL Circuits

This circuit is a programmable synthesizer for various transmitters with PIC16F84, TSA5511 and 2x16 LCD display. Features of PLL module include generation of frequency from 50MHz to 1400MHz with 50KHz steps and viewing the display from 0 to 1900MHz for RX and TX modes.
Posted on Tuesday, April 1, 2008 • Category:
Battery Chargers

The charger in this project is designed to charge two AA NiMH or NiCd cells of any capacity (as long as they are the same) at about 470mA. It will charge 700mAh NiCds in about 1.5 hours, 1500mAh NiMHs in about 3.5 hours, and 2500mAh NiMHs in about 5.5 hours. The charger incorporates an automatic charge cut-off circuit based on cell temperature, and the cells can be left in the charger indefinitely after cut-off.
Posted on Tuesday, April 1, 2008 • Category:
CNC Milling Devices
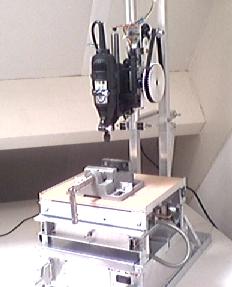
Presented here is a 3-axis CNC milling device for milling small mechanic parts. It's capable of engraving and drilling PCB boards. The milling device is a stepper motor controlled x-y table, and a motorized (z-axis) stand for a 'Dremel' tool.
Posted on Tuesday, April 1, 2008 • Category:
RC Servo Motors
Below you find the schematics of the servo-controller I use. It is based on the PIC 16F84A from Microchip. To obtain a good resolution, I use a version of 20 MHz. It's interfacing to the serial port with a rate of 38400 baud. The PIC is controlling 12 servos in parallel with a resolution of 240 steps over 90 degrees rotation.
Posted on Tuesday, April 1, 2008 • Category:
Frequency Wave Generators
Here's a universal 555 frequency generator with four frequency ranges that might be handy for building any projects that deal with frequencies. JP3 is a button used to switch the device on and off. The power supply (anything from 4-12V) is connected onto JP4. JP2 serves as the output for the signal with an attenuator, if we don't need the full strength (voltage) of the signal, only, say 3V of 5V. We can set the output value by R2. JP1 gives the full strength of the signal, with a current depending on the 555 type you use. R3 is used to set the frequency within a range chosen by the DIP switch S1. You can set which range of frequencies you want to use with a DIP switch. With it you enable or disable a capacitor which is hooked up into the datasheet circuit of the 555 chip.
Circuit-Zone.com © 2007-2025. All Rights Reserved.